Animated elements
You can use animations on your landing page by adding additional CSS, JavaScript, and proper classes to chosen elements.
The animations used on your landing page appear when visitors scroll the page to the place where they are located.
REMEMBER:
Landing pages shouldn’t be overly animated. The movements distract visitors from the content of the page.
We recommend animating bullet points or elements that encourage visitors to take action, e.g., arrows indicating the CTA. Below you can see an example of how animation can work.

Add CSS and JavaScript codes
1. Log in to your account on the Landingi platform and go to the editor of your landing page.
2. In the editor, go to the Page Settings (you will find it in the upper right corner of the toolbar) and click on Add custom CSS.
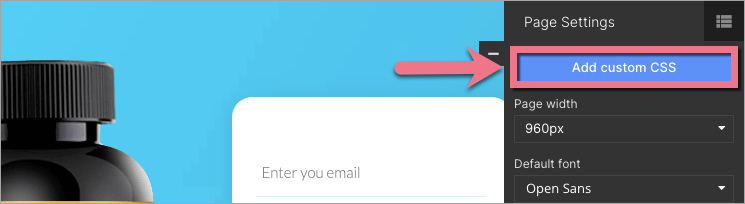
When editing, you can go back to Page Settings by clicking on the arrow:
![]()
3. Add the CSS code indicated below. If you already have other codes here, add it above them, at the top, and save changes.
@import 'https://s3-eu-west-1.amazonaws.com/landingi-ftp/script/wow/v2/animate.min.css';

4. If you want to loop your animation, add the following code below your custom CSS – change animation_name to the name of the animation you chose.
.animation_name {
animation-iteration-count: infinite;
}
5. Publish your landing page and go to the Dashboard and then the JavaScript Code tab. Click Add code.
You can enter the JavaScript Code tab directly from the editor:

6. In the new window, paste the script indicated below in the Body top position on the Main page. Save the changes.
<script src="https://s3-eu-west-1.amazonaws.com/landingi-ftp/script/wow/wow.min.js"></script><script>new WOW().init();</script>

Regardless of the amount of animation on the landing page, you only add the CSS and JavaScript code once.
Add classes to landing page elements
After adding CSS and JavaScript code, you can choose how and which elements of the landing you want to animate.
1. Select the name and type of CSS animation, which you can find, e.g., here: Animate.style. Copy its name.

NOTE: Unfortunately, not all of the CSS animations will work on your landing page. Here is the list of unavailable animations:
- shakeX
- shakeY
- heartBeat
- lightSpeed
- lightSpeedInRight
- lightSpeedInLeft
- lightSpeedOutRight
- lightSpeedOutLeft
- jackInTheBox
- fadeInTopRight
- fadeInTopLeft
2. Enter the editor again and select the element you want to animate – it can be an image, icon, or text. Do not animate buttons triggering pop-ups and lightboxes.
3. In the widget toolbar on the right, find the Other tab and enter the name of your animation in the Classes field. It should be preceded by the command ‘wow’ and one space, e.g., wow flipInX. Do this same for every element that you want to animate.

REMEMBER: The code in the Classes field is case sensitive – always type the exact animation name.
4. Publish your landing page.
Check if the animation displays properly.
Was this manual helpful?

